
Are you looking to build a mining rig? Do not worry, as we have prepared this guide to give you all the information you need.
Mining has become a highly profitable business, thanks to the flood of cryptocurrency. There was a time when mining was simple and didn’t require a lot of effort. However, with the passage of time and more coins coming online, mining has become increasingly difficult.
So, how do you do it? Read the detailed description below to find out.
Table of Contents
Assemble the Frame
You cannot build a house without first constructing its basic structure, right? That is true for a mining rig too. To have a functioning mining rig, you first need to build a frame to house the components.
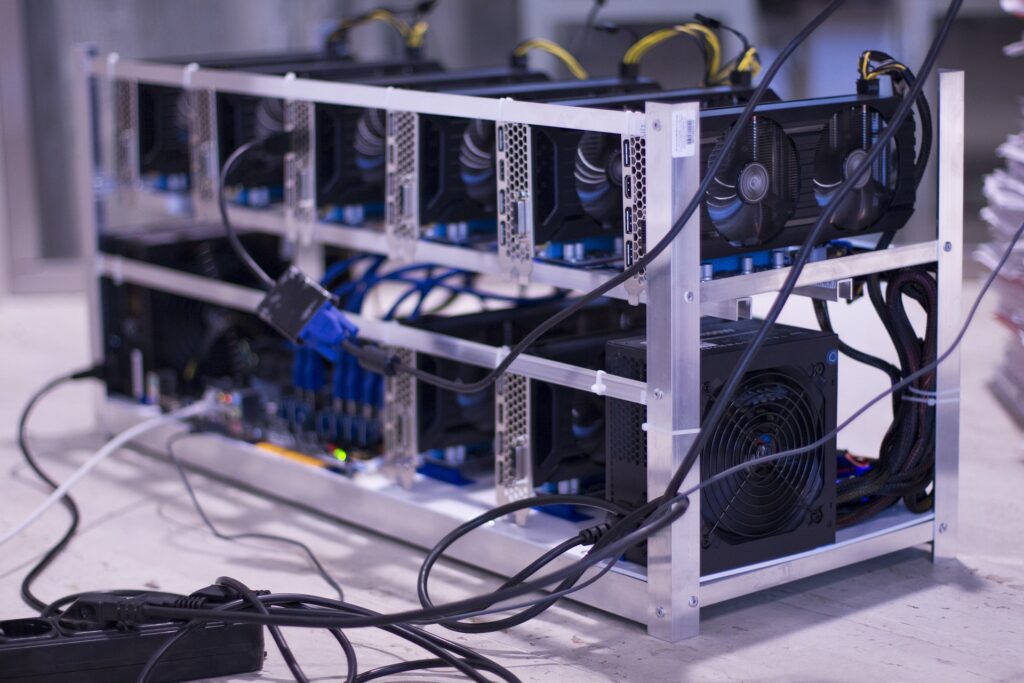
For our rig, we used the AAAwave Sluice V2 12 GPU Mining Rig Frame. It is an excellent frame for housing 12 GPUs alongside other components. It is made out of steel and is easy to assemble. AAAwave has done a good job with space, providing enough for maximum airflow.
It has a great heat dissipation mechanism, which enhances the life of components, and has rubber feet for maximum grip. The required hardware and the instruction manual were included in the box, so we did not lose our way in the middle.
First, attach the four sides to the base plate and attach the side support afterward. Place the bottom of the legs inside the rubber feet so that the frame doesn’t scratch the surface and has a solid grip.
Set-Up & Fit the Motherboard
Setting up your motherboard is the next step of the rig-building process. I used the Asus B250 Mining Expert. Take it out of the box because it is time to place your CPU inside it. Pull the lever next to the CPU socket, which will pop up the black cover.
Place your CPU, the Intel Celeron G3900 2.80 GHz in my case, inside the socket without applying any pressure. Make sure the two dots and the arrow are aligned with the socket. After you have placed the CPU, push the lever back, and the black cover will pop off.
If you already have a stock CPU fan, you are good to go. However, if you do not, you can paste a new one on your CPU using a thermal paste. Your CPU won’t be getting very hot anyway because you are doing GPU mining, not GPU mining. Next, you need to connect your CPU fan to the right port having “CPU Fan” written on it.
After getting done with the CPU and the CPU fan, turn your attention towards RAM, for which I used the v-Color DD4 8GB 2666 MHz. Usually, motherboards either have 2 or 4 RAM slots. If your has 4, place the RAM in the second and the fourth slot. If it has 2, place it in the first slot.
Open the latches on the sides of the slots, which can be on one side or both. After unlocking the latch, place the RAM inside the slot by aligning it correctly and applying some pressure until it clicks and fits. If you have done this correctly, the spots will lock themselves automatically.
Now you have your motherboard ready, and it is time to place it inside the frame. To keep it from touching the frame, you can use risers. If you do not have them, use the cardboard box in which the motherboard arrived. Tighten the nuts, and you are good to go.
Fit the SSD & Power Button
Now fit the SSD by placing it at the bottom of one of the legs and tightening the nuts. However, there is more to this. The SSD has two ports to plug SATA cables. The smaller port houses the SATA cable for data transfer. The second SATA cable is for the power supply.
You have multiple SATA ports available on your motherboard, so you can plug the SATA cable on any of those. Also, install the power button by finding the number of pins at one end of the motherboard. The third and fourth pins from the top left are where you need to attach the power button.
The Power Supplies
We used the Parallel Miner power supply, which comes with two breakout ports. The first port has 16×6 pins to power GPUs or any other component you want. The second port has 22×6 pins. It also has a 24-pin CPU cable and fan cables. Now plug all the essentials on the power supply such as SATA cables, 24-pin & CPU cable.
Try avoiding SATA cables and Molex cables for powering your GPUs. The SATA cables cannot supply enough power and burn quickly. On the other hand, the Molex cables are limited, and one can power just two risers. The six pins on your riser can be connected to the power supply using a PCIe cable.
Splitters are needed when you use more than three GPUs, which we did. The more splitters you have, the more pins you have to attach the GPUs and risers. We used 6-pin to dual 8-pin splitters. However, if you use high-powered cards, use 8-pin to dual 8-pin cables. The more pins you have, the more power you can deliver.
Power Cables & Risers
To attach and use power cables, you first need a power cable strategy. I had 12 GPUs called the RX5700 XTs. Moreover, I had two breakout boards, so I split six GPUs and their risers on one board and the other six GPUs and their risers on the other board.
A cable coming out of the breakout port can power both the GPU and its riser using the splitter. I used 6pin to dual 8pin splitters for all of my GPUs and risers. Align the risers with the GPUs and push the latch on the riser so that the GPU is locked in.
Now connect the USB part of the riser to the PCIe slots on the motherboard. Start with the first X16 slot and keep moving to the second, third, and so on. You can also add fans if you want, depending on your location. Also, managing your cables is recommended to avoid dust build-up.
Congratulations, you have just built your mining rig!
Are you looking to build a mining rig? Do not worry, as we have prepared this guide to give you all the information you need.
Mining has become a highly profitable business, thanks to the flood of cryptocurrency. There was a time when mining was simple and didn’t require a lot of effort. However, with the passage of time and more coins coming online, mining has become increasingly difficult.
So, how do you do it? Read the detailed description below to find out.
Assemble the Frame
You cannot build a house without first constructing its basic structure, right? That is true for a mining rig too. To have a functioning mining rig, you first need to build a frame to house the components.
For our rig, we used the AAAwave Sluice V2 12 GPU Mining Rig Frame. It is an excellent frame for housing 12 GPUs alongside other components. It is made out of steel and is easy to assemble. AAAwave has done a good job with space, providing enough for maximum airflow.
It has a great heat dissipation mechanism, which enhances the life of components, and has rubber feet for maximum grip. The required hardware and the instruction manual were included in the box, so we did not lose our way in the middle.
First, attach the four sides to the base plate and attach the side support afterward. Place the bottom of the legs inside the rubber feet so that the frame doesn’t scratch the surface and has a solid grip.
Set-Up & Fit the Motherboard
Setting up your motherboard is the next step of the rig-building process. I used the Asus B250 Mining Expert. Take it out of the box because it is time to place your CPU inside it. Pull the lever next to the CPU socket, which will pop up the black cover.
Place your CPU, the Intel Celeron G3900 2.80 GHz in my case, inside the socket without applying any pressure. Make sure the two dots and the arrow are aligned with the socket. After you have placed the CPU, push the lever back, and the black cover will pop off.
If you already have a stock CPU fan, you are good to go. However, if you do not, you can paste a new one on your CPU using a thermal paste. Your CPU won’t be getting very hot anyway because you are doing GPU mining, not GPU mining. Next, you need to connect your CPU fan to the right port having “CPU Fan” written on it.
After getting done with the CPU and the CPU fan, turn your attention towards RAM, for which I used the v-Color DD4 8GB 2666 MHz. Usually, motherboards either have 2 or 4 RAM slots. If your has 4, place the RAM in the second and the fourth slot. If it has 2, place it in the first slot.
Open the latches on the sides of the slots, which can be on one side or both. After unlocking the latch, place the RAM inside the slot by aligning it correctly and applying some pressure until it clicks and fits. If you have done this correctly, the spots will lock themselves automatically.
Now you have your motherboard ready, and it is time to place it inside the frame. To keep it from touching the frame, you can use risers. If you do not have them, use the cardboard box in which the motherboard arrived. Tighten the nuts, and you are good to go.
Fit the SSD & Power Button
Now fit the SSD by placing it at the bottom of one of the legs and tightening the nuts. However, there is more to this. The SSD has two ports to plug SATA cables. The smaller port houses the SATA cable for data transfer. The second SATA cable is for the power supply.
You have multiple SATA ports available on your motherboard, so you can plug the SATA cable on any of those. Also, install the power button by finding the number of pins at one end of the motherboard. The third and fourth pins from the top left are where you need to attach the power button.
The Power Supplies
We used the Parallel Miner power supply, which comes with two breakout ports. The first port has 16×6 pins to power GPUs or any other component you want. The second port has 22×6 pins. It also has a 24-pin CPU cable and fan cables. Now plug all the essentials on the power supply such as SATA cables, 24-pin & CPU cable.
Try avoiding SATA cables and Molex cables for powering your GPUs. The SATA cables cannot supply enough power and burn quickly. On the other hand, the Molex cables are limited, and one can power just two risers. The six pins on your riser can be connected to the power supply using a PCIe cable.
Splitters are needed when you use more than three GPUs, which we did. The more splitters you have, the more pins you have to attach the GPUs and risers. We used 6-pin to dual 8-pin splitters. However, if you use high-powered cards, use 8-pin to dual 8-pin cables. The more pins you have, the more power you can deliver.
Power Cables & Risers
To attach and use power cables, you first need a power cable strategy. I had 12 GPUs called the RX5700 XTs. Moreover, I had two breakout boards, so I split six GPUs and their risers on one board and the other six GPUs and their risers on the other board.
A cable coming out of the breakout port can power both the GPU and its riser using the splitter. I used 6pin to dual 8pin splitters for all of my GPUs and risers. Align the risers with the GPUs and push the latch on the riser so that the GPU is locked in.
Now connect the USB part of the riser to the PCIe slots on the motherboard. Start with the first X16 slot and keep moving to the second, third, and so on. You can also add fans if you want, depending on your location. Also, managing your cables is recommended to avoid dust build-up.
Congratulations, you have just built your mining rig!